


how to make a fascinator
-
Table of Contents
- Understanding The Basics Of Fascinator Design
- Choosing The Right Materials For Your Fascinator
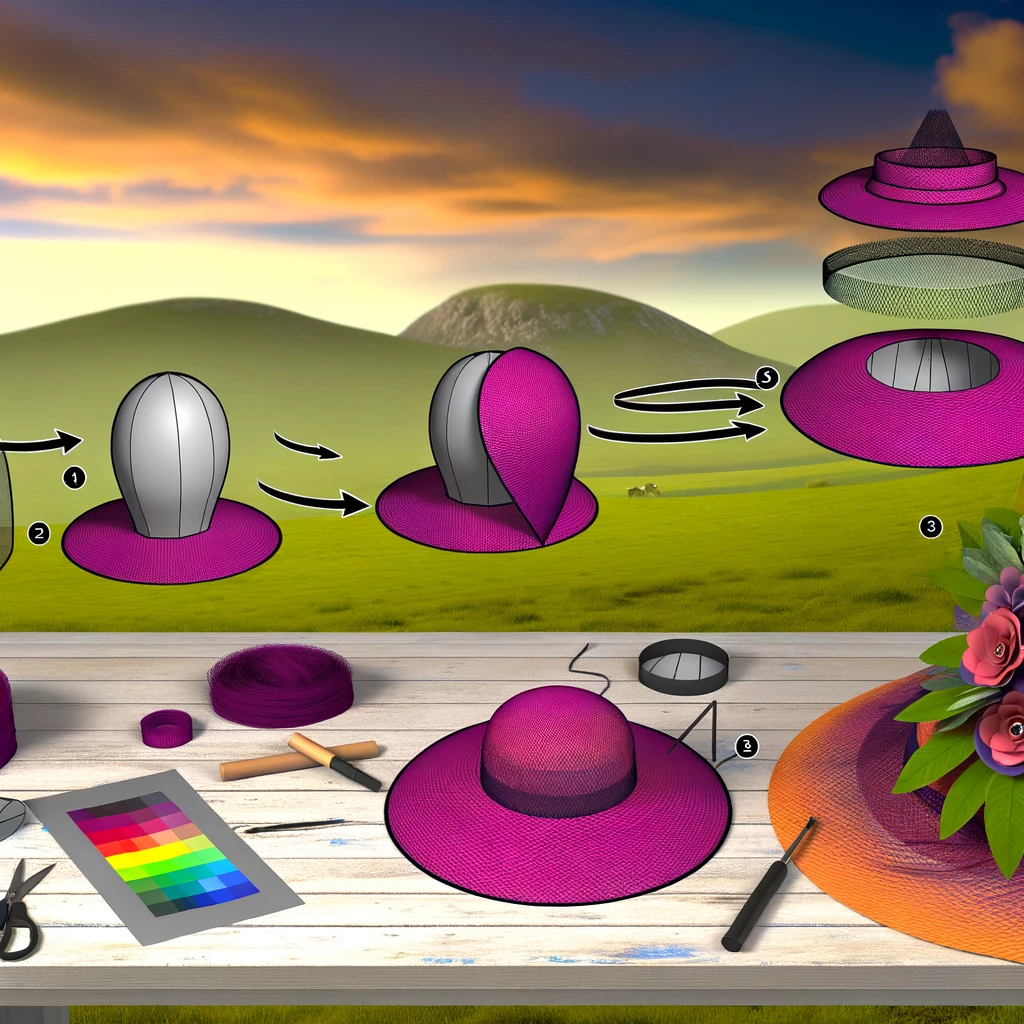
- Step-By-Step Guide To Creating A Simple Fascinator
- Adding Feathers And Flowers To Your Fascinator
- How To Attach A Fascinator To A Headband Or Clip
- Customizing Your Fascinator For Different Occasions
- Tips For Selecting The Perfect Color Scheme
- Incorporating Vintage Elements Into Your Fascinator
- Troubleshooting Common Fascinator-Making Mistakes
- Inspiring Fascinator Designs From Around The World
- Q&A
Creating a fascinator, a stylish and decorative headpiece often worn at formal events, involves a blend of creativity and craftsmanship. These elegant accessories can range from simple to elaborate designs, incorporating materials such as feathers, flowers, beads, and netting. To make a fascinator, you’ll need a base, which can be a headband, comb, or clip, and a selection of decorative elements to suit your style. The process involves arranging and securing these elements onto the base using techniques like sewing or gluing, allowing for endless customization and personal expression. Whether for a wedding, a day at the races, or a special occasion, crafting your own fascinator can be a rewarding and enjoyable experience.
Understanding The Basics Of Fascinator Design
Creating a fascinator is an enchanting journey into the world of millinery, where imagination meets craftsmanship. These whimsical headpieces, often seen gracing the heads of royals and fashionistas alike, are not just accessories but statements of personal style and creativity. To embark on this creative endeavor, one must first understand the basics of fascinator design, which involves a delicate balance of materials, structure, and embellishment.
To begin with, the foundation of any fascinator is its base. This is typically a small, lightweight structure that sits comfortably on the head. Sinamay, a natural fiber derived from the abaca plant, is a popular choice due to its versatility and ease of shaping. However, felt or buckram can also be used, depending on the desired look and season. The base serves as the canvas upon which your artistic vision will unfold, so it is essential to choose a shape and size that complements the wearer’s features and hairstyle.
Once the base is selected, the next step is to consider the structure. This involves deciding how the fascinator will be worn—whether it will perch jauntily on the side of the head, sit elegantly atop, or perhaps even cascade down in a dramatic flourish. This decision will guide the placement of combs, headbands, or clips that secure the fascinator in place. It is crucial to ensure that the piece is not only visually appealing but also comfortable and stable, allowing the wearer to move with confidence and grace.
With the foundation and structure in place, the true artistry of fascinator design comes to life through embellishment. Here, the possibilities are as limitless as your imagination. Feathers, flowers, ribbons, and veils are just a few of the elements that can be incorporated to add texture, color, and movement. When selecting embellishments, consider the occasion and the outfit with which the fascinator will be paired. A wedding might call for soft pastels and delicate lace, while a day at the races could inspire bold colors and extravagant feathers.
As you begin to assemble your fascinator, remember that balance is key. The elements should work harmoniously together, creating a cohesive and visually pleasing design. This might involve playing with symmetry or asymmetry, layering textures, or experimenting with different angles and heights. Don’t be afraid to let your creativity run wild, but also be mindful of the overall aesthetic you wish to achieve.
Throughout the process, it is important to keep in mind the wearer’s personality and style. A fascinator is an extension of one’s individuality, a wearable piece of art that should reflect the spirit and essence of the person who dons it. Whether it’s a subtle nod to vintage elegance or a bold expression of modern flair, the fascinator should feel like a natural extension of the wearer’s identity.
In conclusion, understanding the basics of fascinator design is about more than just technical skills; it’s about embracing the joy of creation and the power of self-expression. As you embark on this journey, let your imagination soar and your hands bring to life a piece that is uniquely yours. With each stitch and embellishment, you are not just crafting a headpiece, but weaving a story that will be worn with pride and delight.
Choosing The Right Materials For Your Fascinator
Creating a fascinator is an art form that allows you to express your unique style and creativity. The journey begins with choosing the right materials, which is crucial to crafting a piece that not only complements your outfit but also stands out as a statement of elegance and individuality. As you embark on this creative endeavor, let your imagination guide you through the myriad of possibilities that each material offers.
To start, consider the base of your fascinator, which serves as the foundation for your design. Sinamay, a natural fiber derived from the abaca plant, is a popular choice due to its lightweight and moldable nature. Its versatility allows you to shape it into various forms, providing a sturdy yet flexible canvas for your embellishments. Alternatively, felt can offer a more structured look, perfect for cooler seasons or when you desire a more substantial presence atop your head.
Once you have selected the base, it’s time to explore the world of embellishments. Feathers are a classic choice, adding a touch of whimsy and movement to your fascinator. Whether you opt for the delicate elegance of peacock feathers or the bold statement of ostrich plumes, feathers can transform your creation into a dynamic piece of art. As you attach them, consider the direction and flow, ensuring they enhance the overall silhouette of your design.
In addition to feathers, flowers can infuse your fascinator with a sense of romance and femininity. Silk flowers offer a timeless beauty, while fabric flowers can be customized to match any color palette. For a more avant-garde approach, consider incorporating unconventional materials such as leather or metal flowers, which can add an edgy twist to your creation. As you arrange these elements, think about balance and proportion, allowing each component to shine without overwhelming the others.
Ribbons and veils can further elevate your fascinator, adding layers of texture and intrigue. Satin or grosgrain ribbons can be woven into bows or loops, providing a touch of sophistication. Meanwhile, a delicate veil can lend an air of mystery and allure, softly framing your face. When selecting these materials, consider how they interact with the other elements, ensuring a harmonious blend that enhances the overall aesthetic.
Color is another vital aspect to consider when choosing materials for your fascinator. While classic black or white can offer a timeless elegance, don’t shy away from bold hues that reflect your personality. Whether you choose a monochromatic scheme or a vibrant mix of colors, ensure that your selections complement your outfit and the occasion. Remember, a well-chosen color palette can transform your fascinator from a mere accessory into a captivating focal point.
As you gather your materials, let your creativity flow and trust your instincts. The process of making a fascinator is as much about exploration and experimentation as it is about precision and technique. Embrace the opportunity to play with different textures, shapes, and colors, allowing your personal style to shine through. With each choice you make, you are not just crafting a fascinator; you are creating a wearable piece of art that tells your story. So, gather your materials, unleash your creativity, and let your fascinator become a reflection of your unique vision and flair.
Step-By-Step Guide To Creating A Simple Fascinator
Creating a fascinator is a delightful journey into the world of fashion and creativity, where imagination meets craftsmanship. This elegant headpiece, often seen at weddings, races, and other formal events, can be a stunning addition to any outfit. With a few materials and a touch of creativity, you can craft a fascinator that reflects your personal style and flair. The process is not only rewarding but also an opportunity to express your individuality through design.
To begin, gather your materials. You will need a base, which can be a small hat or a headband, depending on your preference. Sinamay, a lightweight and versatile fabric, is often used for the base due to its ability to hold shape while remaining comfortable to wear. Additionally, you will need embellishments such as feathers, ribbons, beads, or flowers to add personality and charm to your creation. A hot glue gun, scissors, and a needle and thread will also be essential tools in your fascinator-making kit.
Once you have your materials ready, start by shaping the base. If you are using sinamay, cut it into the desired shape and size, keeping in mind the overall look you wish to achieve. The base is the foundation of your fascinator, so take your time to ensure it is sturdy and well-formed. If you are using a headband, consider wrapping it with ribbon or fabric to match the color scheme of your design. This step not only enhances the aesthetic appeal but also provides a cohesive look.
With the base prepared, it is time to unleash your creativity with embellishments. Feathers are a popular choice for fascinators, offering a touch of elegance and movement. Select feathers that complement your color palette and attach them to the base using a hot glue gun. Arrange them in a way that creates balance and harmony, allowing them to fan out gracefully. If you prefer a more floral design, silk or fabric flowers can be sewn or glued onto the base, adding a romantic and feminine touch.
Ribbons and beads can further enhance your fascinator, providing texture and sparkle. Consider weaving ribbons through the design or creating bows for added dimension. Beads can be strategically placed to catch the light, adding a subtle shimmer that draws attention. As you work, step back occasionally to assess the overall composition, ensuring that each element contributes to a cohesive and visually pleasing design.
As you near completion, secure all elements firmly to the base. This step is crucial to ensure that your fascinator remains intact during wear. Use a needle and thread to reinforce any glued areas, providing extra stability. Once everything is securely in place, try on your fascinator to ensure it sits comfortably and securely on your head. Adjust any elements as needed to achieve the perfect fit and look.
In conclusion, making a fascinator is a creative endeavor that allows you to explore your artistic side while crafting a unique accessory. With patience and imagination, you can transform simple materials into a stunning headpiece that reflects your personal style. Whether for a special occasion or simply to indulge in a creative project, the process of making a fascinator is both enjoyable and fulfilling. Embrace the opportunity to express yourself through design, and let your fascinator be a testament to your creativity and individuality.
Adding Feathers And Flowers To Your Fascinator
Creating a fascinator is an art form that allows you to express your creativity and personal style. As you embark on this journey of adding feathers and flowers to your fascinator, imagine yourself as an artist with a blank canvas, ready to bring your vision to life. The process of embellishing your fascinator with these elements is not just about decoration; it is about crafting a story, a narrative that speaks to who you are and the occasion you are preparing for.
To begin, consider the theme or mood you wish to convey. Feathers, with their delicate and ethereal quality, can evoke a sense of elegance and grace. They can be bold and dramatic or soft and subtle, depending on the type and color you choose. Flowers, on the other hand, bring a touch of nature’s beauty, symbolizing growth, renewal, and vibrancy. The combination of these elements can transform a simple headpiece into a stunning work of art.
As you gather your materials, let your imagination guide you. Choose feathers that complement the color palette of your outfit or contrast it for a striking effect. Long, sweeping feathers can add height and drama, while smaller, clustered feathers can create texture and depth. When selecting flowers, consider both real and artificial options. Real flowers offer a fresh and organic feel, perfect for a spring or summer event. However, artificial flowers provide durability and the ability to experiment with colors and styles that may not be available naturally.
Once you have your materials, it’s time to start assembling your fascinator. Begin by arranging the feathers. You might start with a focal point, such as a large feather or a cluster of smaller ones, and build around it. Use a hot glue gun or floral wire to secure the feathers in place, ensuring they are firmly attached but still retain their natural movement. As you work, step back occasionally to view your creation from different angles, ensuring balance and harmony in your design.
Next, introduce the flowers. Consider their placement carefully, as they can serve as the centerpiece of your fascinator or as complementary accents. If using real flowers, remember to keep them fresh by misting them lightly with water. For artificial flowers, you can manipulate the petals and leaves to achieve the desired shape and fullness. As you attach the flowers, think about how they interact with the feathers. Do they blend seamlessly, or do they stand out as bold statements? The choice is yours, and each decision adds another layer to your story.
As you near completion, take a moment to reflect on your creation. Does it capture the essence of what you envisioned? Does it tell the story you wanted to share? Making a fascinator is not just about following a set of instructions; it is about infusing your personality and creativity into every detail. With each feather and flower, you are not only crafting a beautiful accessory but also a piece of art that is uniquely yours.
Finally, wear your fascinator with confidence and pride. Whether you are attending a wedding, a garden party, or a day at the races, your fascinator is a reflection of your individuality and style. As you step out into the world, let your creation speak for itself, a testament to your creativity and the joy of making something beautiful with your own hands.
How To Attach A Fascinator To A Headband Or Clip
Creating a fascinator is a delightful journey into the world of fashion and personal expression. These whimsical headpieces, often adorned with feathers, flowers, and other embellishments, can transform any outfit into a statement. Once you’ve crafted your fascinator, the next step is to attach it to a headband or clip, ensuring it sits perfectly on your head. This process, while seemingly simple, is an art in itself, requiring a blend of creativity and practicality.
To begin, consider the base of your fascinator. The base is the foundation upon which your entire creation rests, and it plays a crucial role in how the fascinator will attach to your headband or clip. Typically, bases are made from materials like sinamay or felt, chosen for their lightweight yet sturdy nature. As you prepare to attach your fascinator, ensure that the base is secure and well-constructed, as this will provide the stability needed for a comfortable fit.
Next, decide whether a headband or a clip is more suitable for your fascinator. Headbands offer a classic and secure option, ideal for larger fascinators that require more support. Clips, on the other hand, provide a more discreet attachment, perfect for smaller, more delicate designs. Your choice will depend on the style and size of your fascinator, as well as your personal preference for comfort and aesthetics.
Once you’ve chosen your attachment method, it’s time to bring your vision to life. If you’re using a headband, position the fascinator on the band where you envision it sitting on your head. This is where your creativity truly shines, as the placement can dramatically alter the overall look. For a more traditional style, position the fascinator slightly to one side, adding an elegant asymmetry to your ensemble. Secure the base of the fascinator to the headband using a strong adhesive, such as hot glue or fabric glue, ensuring it holds firmly in place. For added security, you can also sew the base to the headband using a needle and thread, matching the color to maintain a seamless appearance.
Alternatively, if a clip is your chosen method, the process is slightly different but equally rewarding. Select a sturdy clip, such as an alligator or snap clip, that can support the weight of your fascinator. Attach the clip to the base using glue, ensuring it is centered and aligned with the design’s balance. This will help the fascinator sit comfortably and securely when worn. As with the headband, sewing the clip to the base can provide additional stability, especially for heavier designs.
Throughout this process, remember that the key to a successful fascinator is not only in its attachment but also in its wearability. Test the fascinator on your head, adjusting the angle and position until it feels comfortable and looks just right. This final step is crucial, as it ensures that your creation not only dazzles but also stays in place throughout your event.
In conclusion, attaching a fascinator to a headband or clip is a creative endeavor that combines artistry with functionality. By carefully considering the base, choosing the right attachment method, and securing your design with precision, you can create a fascinator that is both beautiful and practical. As you embark on this journey, let your imagination guide you, and take pride in the unique piece of wearable art you’ve crafted.
Customizing Your Fascinator For Different Occasions
Creating a fascinator is an art form that allows you to express your individuality and creativity, making it the perfect accessory for a variety of occasions. Whether you’re attending a wedding, a garden party, or a day at the races, a fascinator can elevate your outfit and make a statement. The beauty of fascinators lies in their versatility; they can be customized to suit any event, mood, or personal style. As you embark on the journey of crafting your own fascinator, consider the occasion and let it guide your design choices.
To begin with, think about the color palette that will best complement your outfit and the event’s theme. For a wedding, soft pastels or elegant neutrals might be appropriate, while a vibrant, bold color could be perfect for a lively garden party. The choice of color can set the tone for your fascinator, so take the time to experiment with different shades and combinations. Transitioning from color to materials, consider the textures and fabrics that will bring your vision to life. Delicate lace, luxurious silk, or playful feathers can each add a unique touch to your creation.
As you gather your materials, think about the structure and shape of your fascinator. The base is crucial, as it provides the foundation for your design. You might choose a classic teardrop shape, a whimsical swirl, or even a dramatic wide-brimmed style. The shape should not only reflect the occasion but also flatter your face and hairstyle. Once you have your base, it’s time to add embellishments that will make your fascinator truly one-of-a-kind. Flowers, beads, ribbons, and veils can all be used to enhance your design, and the possibilities are endless.
When customizing your fascinator, consider the balance between simplicity and extravagance. For a formal event, a more understated design might be appropriate, while a festive occasion could call for something more elaborate. As you add each element, step back and assess the overall look. Does it feel cohesive? Does it capture the essence of the event? These questions can help guide your creative process and ensure that your fascinator is a perfect fit for the occasion.
Moreover, don’t be afraid to let your personality shine through in your design. A fascinator is an extension of your style, and it should reflect who you are. If you have a playful spirit, incorporate unexpected elements like quirky charms or bold patterns. If you prefer a more classic look, opt for timeless details like pearls or delicate embroidery. The key is to create something that feels authentic to you.
Finally, as you complete your fascinator, take a moment to appreciate the artistry and effort that went into its creation. Wearing a fascinator is not just about fashion; it’s about celebrating your creativity and the joy of self-expression. As you don your custom-made accessory, let it remind you of the beauty of individuality and the power of personal style. Whether you’re mingling at a wedding or dancing at a party, your fascinator will be a testament to your unique vision and the special occasion it was crafted for.
Tips For Selecting The Perfect Color Scheme
Creating a fascinator is an art form that allows you to express your personality and style through a unique headpiece. One of the most crucial aspects of designing a fascinator is selecting the perfect color scheme. The colors you choose can transform your creation from a simple accessory into a statement piece that captures attention and admiration. To begin this creative journey, consider the occasion for which you are crafting your fascinator. Whether it’s a wedding, a garden party, or a day at the races, the event’s theme and setting can provide valuable inspiration for your color palette.
As you ponder the occasion, think about the emotions and atmosphere you wish to convey. For a romantic wedding, soft pastels like blush pink, lavender, or mint green can evoke a sense of elegance and grace. On the other hand, a vibrant garden party might call for bold, lively hues such as fuchsia, turquoise, or sunny yellow, which can mirror the exuberance of blooming flowers. Transitioning from the event to your personal style, consider the colors that resonate with you and reflect your personality. If you are drawn to classic elegance, a monochromatic scheme in shades of ivory, black, or navy can exude sophistication. Alternatively, if you have a penchant for the avant-garde, experimenting with unexpected color combinations like coral and teal or mustard and plum can result in a strikingly modern fascinator.
Furthermore, it is essential to take into account the colors of your outfit. A harmonious color scheme can tie your entire ensemble together, creating a cohesive and polished look. If your outfit features a dominant color, you might choose to incorporate it into your fascinator, either as the main hue or as an accent. Conversely, selecting complementary colors can add depth and interest, ensuring your fascinator stands out while still blending seamlessly with your attire. As you explore different color options, don’t shy away from using a color wheel as a tool to guide your choices. Understanding the relationships between colors can help you create a balanced and visually appealing design. Analogous colors, which sit next to each other on the color wheel, can create a serene and harmonious effect. In contrast, complementary colors, which are opposite each other, can produce a dynamic and eye-catching contrast.
In addition to the color wheel, consider the textures and materials you plan to use in your fascinator. The interplay between color and texture can add another layer of sophistication to your design. For instance, pairing a matte fabric with a glossy ribbon in the same color family can create subtle variations that catch the light beautifully. Similarly, incorporating metallic elements like gold or silver can add a touch of glamour and elevate your fascinator to new heights. As you finalize your color scheme, remember that there are no strict rules in the world of fashion. The most important aspect is that your fascinator reflects your vision and makes you feel confident and beautiful. Embrace the creative process, and don’t be afraid to take risks and experiment with different combinations. After all, the perfect color scheme is one that resonates with you and brings your fascinator to life in a way that is uniquely yours.
Incorporating Vintage Elements Into Your Fascinator
Creating a fascinator is an art form that allows for personal expression and creativity, and incorporating vintage elements can elevate your design to a new level of elegance and charm. The allure of vintage pieces lies in their history and the stories they carry, making them perfect for adding a unique touch to your fascinator. To begin this creative journey, start by exploring your local thrift stores, antique shops, or even your grandmother’s attic for hidden treasures. Look for items such as brooches, lace, feathers, or even old hats that can be deconstructed and repurposed. These elements will serve as the foundation for your vintage-inspired fascinator.
Once you have gathered your vintage materials, it’s time to consider the color palette and overall theme of your fascinator. Vintage elements often come in muted tones, such as soft pastels, rich jewel tones, or classic black and white. These colors can be beautifully complemented by modern materials, creating a harmonious blend of old and new. As you lay out your materials, envision how each piece will contribute to the overall design. This is where your creativity truly comes into play, as you experiment with different arrangements and combinations.
To ensure a cohesive design, consider using a base that complements your vintage elements. A simple headband or a small hat base can provide the perfect canvas for your creation. Secure your base with a sturdy fabric, such as felt or sinamay, which will also help to anchor your vintage pieces. As you begin to attach your elements, use a combination of sewing and gluing techniques to ensure durability. This process requires patience and precision, but the result will be a fascinator that is both beautiful and resilient.
Incorporating vintage lace is a wonderful way to add texture and elegance to your fascinator. Lace can be draped over the base, creating a delicate veil effect, or cut into smaller pieces to accentuate specific areas. Pairing lace with vintage brooches or buttons can create a stunning focal point, drawing the eye to the intricate details of your design. Feathers, another classic element, can add a touch of whimsy and movement. Vintage feathers often have a unique patina that modern feathers lack, adding to the authenticity of your piece.
As you continue to build your fascinator, remember that balance is key. The vintage elements should enhance, not overwhelm, the overall design. Consider the weight and size of each piece, ensuring that the fascinator remains comfortable to wear. If you find that your design is becoming too heavy on one side, counterbalance it with additional elements on the opposite side. This will create a harmonious and visually appealing composition.
Finally, as you complete your fascinator, take a moment to reflect on the journey of creation. Each vintage element you have incorporated carries a piece of history, and by giving it new life, you are preserving its story for future generations. Your fascinator is not just an accessory; it is a testament to the timeless beauty of vintage design and your own creative vision. Wear it with pride, knowing that you have crafted something truly unique and inspiring.
Troubleshooting Common Fascinator-Making Mistakes
Creating a fascinator is an art form that combines creativity, patience, and a touch of whimsy. However, like any artistic endeavor, it can come with its own set of challenges. As you embark on this journey of crafting a unique headpiece, it’s important to remember that mistakes are simply stepping stones to mastery. Embracing these challenges with an open mind can transform potential frustration into a rewarding learning experience.
One common issue that many beginners face is the choice of materials. Selecting the right fabric and embellishments is crucial, as they form the foundation of your fascinator. If you find that your materials are not cooperating, consider experimenting with different textures and weights. For instance, if your chosen fabric is too stiff or too flimsy, try blending it with another material to achieve the desired balance. This not only enhances the structural integrity of your piece but also adds depth and interest to the design.
Another frequent stumbling block is the attachment of the fascinator to the base. If your creation feels unstable or wobbly, it might be due to an imbalance in weight distribution. To address this, ensure that heavier elements are positioned closer to the base, providing a solid anchor. Additionally, using a combination of glue and stitching can offer extra security, ensuring that your fascinator remains firmly in place, even during the most energetic of events.
Transitioning from the base to the decorative elements, you might encounter difficulties in achieving the desired shape or form. This is where the magic of wire comes into play. Wire can be your best friend, offering flexibility and support to mold your fascinator into the perfect silhouette. If your design feels flat or lacks dimension, consider incorporating wire to create loops, swirls, or even a dramatic upward sweep. This not only adds visual interest but also allows for greater creativity in your design.
Color coordination is another area where many creators find themselves second-guessing their choices. If your fascinator appears too busy or lacks cohesion, take a step back and evaluate the color palette. Sometimes, simplifying the color scheme or introducing a unifying element, such as a ribbon or a feather in a complementary shade, can bring harmony to your piece. Remember, the goal is to create a statement piece that enhances, rather than overwhelms, the wearer.
Finally, patience is key when troubleshooting any fascinator-making mishap. It’s easy to become discouraged when things don’t go as planned, but each mistake is an opportunity to refine your skills and discover new techniques. Take breaks when needed, and don’t hesitate to seek inspiration from other creators or online resources. The fascinator-making community is vast and welcoming, offering a wealth of knowledge and support.
In conclusion, while the path to creating a perfect fascinator may be fraught with challenges, it is also filled with opportunities for growth and creativity. By approaching each obstacle with a problem-solving mindset and a willingness to experiment, you can transform potential setbacks into triumphs. Remember, every great artist was once an amateur, and with perseverance and passion, you too can craft a fascinator that is as unique and beautiful as you are.
Inspiring Fascinator Designs From Around The World
Creating a fascinator is an art form that allows for the expression of individuality and creativity, drawing inspiration from diverse cultures around the globe. These headpieces, often seen at weddings, races, and other formal events, are not just accessories but statements of style and personality. As we explore the fascinating world of fascinators, we can draw inspiration from various designs that reflect the rich tapestry of global fashion.
Starting with the elegance of British millinery, fascinators from the United Kingdom often feature intricate lace, feathers, and delicate netting. These elements come together to create a sense of sophistication and timelessness. The British tradition of wearing fascinators to events like the Royal Ascot has set a standard for elegance, where each piece is a testament to the wearer’s personal style. The use of soft pastels and classic shapes in these designs can inspire those looking to create a fascinator with a touch of classic charm.
Transitioning to the vibrant and bold designs of Africa, fascinators here often incorporate bright colors and striking patterns. African fascinators are known for their use of traditional fabrics such as Ankara and Kente, which bring a sense of cultural heritage and pride to each piece. The boldness of these designs encourages creativity and the use of unconventional materials, making them perfect for those who wish to make a statement. The juxtaposition of traditional patterns with modern shapes can inspire a fusion of old and new in your own fascinator creation.
Moving across the globe to Asia, fascinators inspired by this region often reflect a sense of harmony and balance. Japanese fascinators, for instance, might incorporate elements of origami, using folded paper or fabric to create intricate designs that are both delicate and striking. The use of natural elements such as flowers and leaves is also prevalent, symbolizing a connection to nature. This approach can inspire a more minimalist design, focusing on the beauty of simplicity and the elegance of natural forms.
In Australia, fascinators often reflect the country’s unique flora and fauna, with designs that incorporate native flowers and feathers. The use of earthy tones and organic shapes can inspire a connection to the natural world, encouraging the use of sustainable materials in fascinator creation. This approach not only results in beautiful designs but also promotes environmental consciousness, making it a perfect choice for those who value sustainability.
Finally, the avant-garde designs from the fashion capitals of the world, such as Paris and New York, push the boundaries of traditional fascinator design. These pieces often feature unexpected materials and bold shapes, challenging conventional notions of what a fascinator can be. The creativity and innovation seen in these designs can inspire those who wish to experiment and take risks in their own creations, resulting in unique and unforgettable pieces.
In conclusion, the world of fascinators is as diverse as it is inspiring. By drawing on the rich traditions and innovative designs from around the globe, you can create a fascinator that not only complements your personal style but also tells a story. Whether you are inspired by the elegance of British millinery, the boldness of African patterns, the harmony of Asian designs, the natural beauty of Australian elements, or the avant-garde spirit of fashion capitals, the possibilities are endless. Embrace the journey of creation, and let your fascinator be a reflection of your unique vision and the world around you.
Q&A
1. **What materials are needed to make a fascinator?**
– Sinamay fabric, feathers, netting or veiling, a headband or hair clip, hot glue gun, scissors, needle and thread, embellishments like beads or flowers.
2. **How do you shape the base of a fascinator?**
– Cut a piece of sinamay fabric into the desired shape, such as a circle or oval, and mold it over a rounded object like a bowl to create a dome shape. Use steam to help set the shape.
3. **How do you attach the fascinator to a headband or clip?**
– Sew or glue the shaped base onto a headband or hair clip, ensuring it is securely attached and positioned for comfortable wear.
4. **How can you add height to a fascinator?**
– Use loops of sinamay or add tall feathers to create vertical interest. Secure them with glue or by sewing them onto the base.
5. **How do you incorporate netting or veiling into a fascinator?**
– Cut a piece of netting and gather it at one end. Attach it to the base by sewing or gluing, allowing it to drape over the face or around the fascinator.
6. **What is a simple way to add embellishments to a fascinator?**
– Use a hot glue gun to attach beads, silk flowers, or rhinestones to the base or around the edges for added decoration.
7. **How do you ensure the fascinator is balanced?**
– Arrange the elements symmetrically or counterbalance larger pieces with smaller ones on the opposite side to prevent it from tipping.
8. **How can you make a fascinator more secure on the head?**
– Use a combination of a headband and hairpins to anchor the fascinator in place, especially if it is large or heavy.
9. **What is a tip for choosing colors for a fascinator?**
– Select colors that complement your outfit or choose neutral tones like black, white, or beige for versatility.
10. **How do you finish the edges of a sinamay base?**
– Trim any frayed edges and use a small amount of glue to seal them, or sew a narrow ribbon around the edge for a polished look.To make a fascinator, begin by selecting a base, such as a small hat or headband, and choose materials like feathers, netting, ribbons, and embellishments. Secure the base with a comb or clip for attachment. Arrange and layer the materials creatively, using hot glue or stitching to fix them in place. Ensure balance and proportion in the design for aesthetic appeal. Test the fascinator for comfort and stability when worn. In conclusion, creating a fascinator involves selecting a suitable base, creatively arranging decorative elements, and ensuring secure attachment, resulting in a unique and stylish headpiece.